AWS Practical — 1
- Aastha Thakker
- Oct 29, 2025
- 4 min read


Alright, let’s move from theory to practical!
We’ve discussed the breadth of AWS capabilities, and now it’s time to get our hands on cloud.
For those of you who are already eager, I trust you’ve already taken advantage of AWS’s generous free tier. If not, don’t worry, you can always set up an account and explore the platform.
In this part we’ll be covering
Configuring your EC2 instance
Setting up a VPC (Virtual Private Cloud)
Creating an S3 bucket
Setting up RDS (Relational Database Service)
A) Setting up your EC2 instance
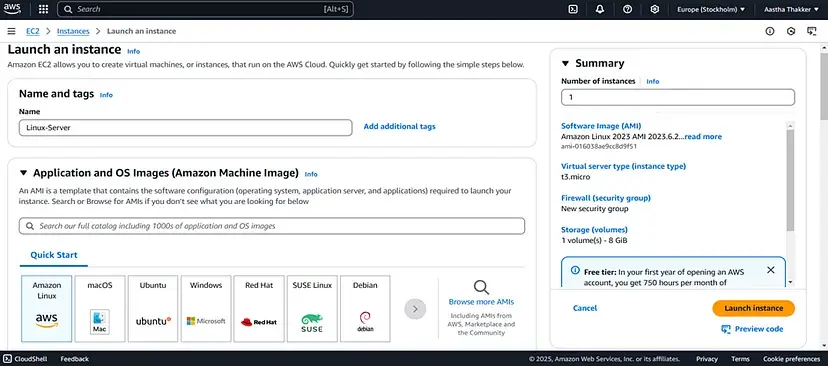
1. Go to AWS Console and log in with your credentials. At the top of the console, there’s a search bar. Type “EC2.” EC2 stands for “Elastic Compute Cloud,” which is AWS’s service for providing virtual servers. This will take you to the main EC2 page, where you can manage your virtual servers. Click “Launch Instance”, this button starts the process of creating a new virtual server.

2. Give your instance a descriptive name, like “MyFirstServer,” so you can easily identify it later. We’ll use “Amazon Linux,” which is a Linux distribution provided by AWS. It’s a popular choice for its stability and compatibility with AWS services. The instance type determines the hardware configuration of your virtual server, such as CPU, memory, and network performance.

3. A key pair is used to securely connect to your instance. It consists of a public key (stored by AWS) and a private key (that you keep).
If you have not already created a key pair, you will be prompted to create one, or you can proceed without one for this exercise, but you will not be able to connect to the instance without one.

4. And your instance is ready!

B) Setting up a VPC (Virtual Private Cloud)
A VPC is like renting your own private stall within that marketplace.
The AWS Cloud is like a shared lab space. You and other students have access to various resources.
A VPC is like creating your own isolated workspace within that lab.
You get your own dedicated area where you can set up your project’s components without interfering with other groups’ work.
You can decide how your project is organized: where to store your code, where to run your simulations, and how to connect your different parts.You can control who has access to your workspace, preventing accidental changes or data leaks.
The CIDR block is the size of your workspace.
Why is this important?
Organization: You can keep your project files and resources organized and separate from others.
Control: You can experiment and test your code without worrying about breaking anything in the shared lab.
Security: You can protect your project data and prevent unauthorized access.
Creating the VPC is like reserving your own workspace.
1. Begin by logging into your AWS Management Console. Once logged in, use the search bar to locate and navigate to the “VPC” service.
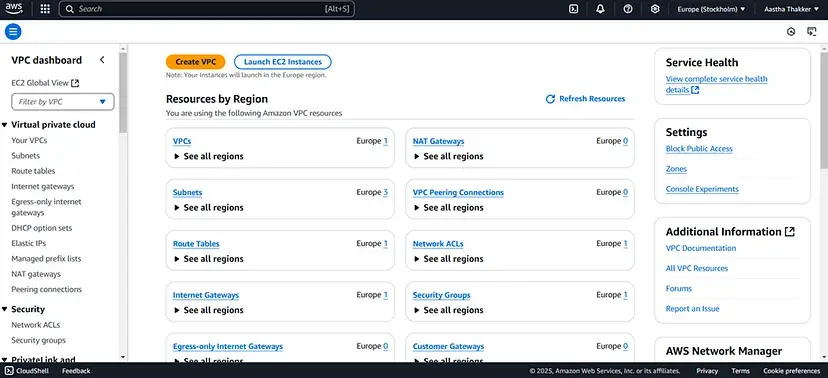
2. Within the VPC dashboard, click the “Create VPC” button. You’ll be prompted to provide a descriptive “Name tag” for your new VPC.

And you will get a pop up of “You successfully created a VPC!”
C) Creating an S3 bucket
An S3 bucket is a fundamental storage container in AWS’s Simple Storage Service (S3). It’s essentially a globally unique, flat namespace where you store “objects” (files and their metadata). S3 provides highly scalable, durable, and secure object storage, essential for various applications like data backups, media storage, and static website hosting.
1. Log into the AWS Management Console and go to the S3 service. Then, click “Create bucket” to begin the process.

2. Provide a globally unique name for your bucket and select the AWS Region where you want it to reside. The name must be unique across all existing S3 buckets.

3. Adjust settings to enhance security and data integrity, including:
“Block all public access” to restrict unauthorized access.
“Enable versioning” to keep a history of object changes.
“Enable server-side encryption” to protect data at rest.

4. Review your settings and click “Create bucket” to provision your new S3 bucket.

5. After creation, you can upload files or folders (objects) to your bucket. This allows you to store and retrieve data within your S3 environment.

D) Setting up RDS (Relational Database Service)
Amazon RDS is like having a database administrator on demand. It lets you easily set up, manage, and scale relational databases (like MySQL, PostgreSQL, or SQL Server) in the cloud. You don’t have to worry about the underlying hardware or operating system, allowing you to focus on your application.
1. Log into the AWS Management Console and search for “RDS.” Click “Create database” to begin. Make sure you are using an IAM user with least privilege access, and not the root user. Enable Multi-Factor Authentication (MFA) on your AWS account.

2. Select the “Standard create” method for more control. Choose your desired database engine (e.g., MySQL, PostgreSQL). Choose the latest stable version of your database engine to benefit from the latest security patches.

3. Provide a unique database instance identifier.
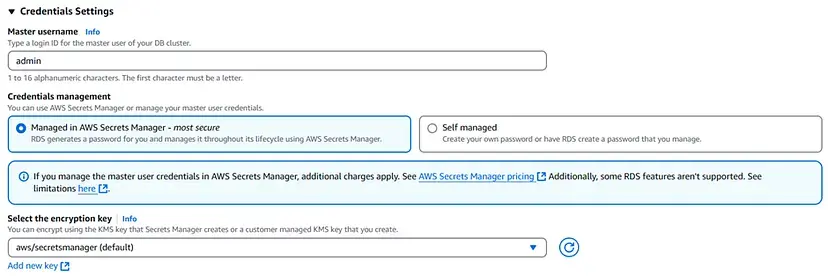
Configure database credentials, instance size, and storage. Use a strong, unique password for the database administrator account. For the network configuration, place your RDS instance in a private subnet within your VPC, and only allow access from your application servers’ security groups.
Disable Public access.
Enable storage encryption.
Enable automatic backups.
4. Now click on “Create Database”.

Building Your Own Architecture
Now that you’ve learned how to set up these core AWS services individually, the real power comes from connecting them to create a cohesive architecture. Before our next part, design and implement a simple architecture that incorporates all four services we’ve covered.
Stay curious, keep building, and remember in the cloud, you can always tear down and rebuild your infrastructure to learn from your mistakes!

Comments