Blockchain Explorers: What's Actually Happening On-Chain


We have covered a lot of foundation on blockchain in this series, starting from understanding centralized and decentralized networks, exploring what blockchain really is, comparing different blockchain types, diving into consensus mechanisms, and uncovering the protocol stack that keeps everything running. But theory can only take you so far. At some point you have to stop reading definitions and go look at the real thing.
So, this post is the practical demo. If someone hands you a wallet address or a transaction ID and says, “check it,” where do you actually go? The answer is a blockchain explorer and once you know how to read one, half the mystery around “trustless” systems disappear, because you can verify almost everything yourself.
What Is a Blockchain Explorer?
A blockchain explorer is a web app that reads every block on a given chain, indexes the data inside it, and gives you a search bar to look through all of it. Functionally it’s close to a search engine, but with one big difference: Google decides what gets indexed and what gets buried. A blockchain explorer doesn’t get to hide anything, because every transaction on a public chain is visible to anyone who wants to look.
The inner workings of the explorer involve connecting to one or more full nodes in the network, fetching new blocks in near real time as they are mined, processing transaction data from those blocks and finally storing all of that in a very efficient database that will allow us to query transaction details very fast. Essentially, it’s building a real-time database of all tokens transacted, the balances in all wallets and all smart contracts on the blockchain since inception.
Different chains need different explorers, because the data structures aren’t the same. Bitcoin uses the UTXO model, Ethereum uses an account-based model, and a Layer-2 network like Arbitrum has its own batching logic on top of that. So instead of one universal explorer, you get an explorer per chain (or per family of compatible chains):
Etherscan: the default explorer for Ethereum, and the template most EVM-chain explorers copy
Blockchain.com Explorer: one of the oldest explorers around, covering BTC, ETH, and BCH
Mempool.space: open-source, Bitcoin-focused, and the go-to for anyone tracking mempool congestion and fees
Solscan: the primary explorer for Solana
BscScan: same interface family as Etherscan, built for BNB Smart Chain

What Can You Actually See?
Every explorer organizes around three core objects: transactions, addresses, and blocks. Understanding these three can help you navigate any chain’s explorer, even ones you’ve never opened before.
Transaction Data
Paste a transaction hash (TXID) into the search bar and you’ll get:
Status: confirmed, pending, or failed
Block number: which block included it
Timestamp: when that block was mined or validated
From / To addresses: sender and receiver (or contract)
Value: amount transferred
Fee: gas fee (Ethereum) or transaction fee (Bitcoin), paid to whoever secured the block
Input data: for contract calls, the encoded function and parameters being executed
One thing that trips up almost everyone the first time: on Ethereum, a failed transaction still shows up and still costs gas. That feels wrong until you remember the network still did the work of attempting execution, the gas pays for the computation, not for success.

Labeled addresses: Instead of displaying only wallet addresses, Etherscan resolves Ethereum Name Service (ENS) names such as titanbuilder.eth whenever available. Both the sender (titanbuilder.eth) and receiver (Coinbase: MEV Builder) have recognizable names instead of long hexadecimal addresses. Blockchain explorers maintain labels for many well-known wallets, exchanges, staking services, and protocols, making it much easier to identify who or what an address belongs to.
Successful confirmation: The transaction shows a Success status along with 193 block confirmations, indicating that it has been permanently recorded on the blockchain and is extremely unlikely to be reversed.
The Value field matters here: This transaction is simply transferring ETH from one address to another. Therefore, the Value field (0.003726647860521291 ETH) represents the actual amount sent.
Transaction fee is separate from the transfer amount: The sender transferred 0.003726647860521291 ETH, but also paid an additional 0.000002080666371 ETH as the network fee. The recipient receives only the transferred value, while the transaction fee is paid to the network validators.
Wallet and Address Data
Drop any wallet address into the search bar and you get:
Current balance
Full transaction history
Token and NFT holdings
Here’s the part that catches new students off guard: this works for every address, including exchange cold wallets, protocol treasuries, and smart contracts. There’s no privacy layer at the address level on a public chain, whether you’re holding funds in a software wallet like Trust Wallet or a hardware wallet like a Ledger Nano X, the balance and history sitting behind that address is fully visible to anyone. What actually protects you is pseudonymity: the address itself isn’t tied to your name unless something links it, an exchange KYC deposit, a public post, a chain-analysis firm doing its job. Once that link exists, everything that address has ever done becomes traceable.

ETH Balance & Value: Shows the current ETH balance along with its estimated value in USD.
Token Holdings: Lists the ERC-20 tokens held by the address and their estimated value.
Transaction History: Displays recent transactions with details such as the transaction hash, method, block number, age, amount, and transaction fee.
Transaction Direction: The IN label indicates that this wallet is receiving ETH from different builders like BuilderNet and Titan Builder.
Note: This address has processed over one million transactions, demonstrating that blockchain explorers can also track high-activity wallets belonging to exchanges, validators, protocols, or other large organizations, not just individual users.
Block Data
Click into a specific block and you get the block’s summary:
Block height: its sequential position in the chain
Block hash: its unique cryptographic fingerprint
Previous block hash: the link that makes it a chain
Miner / validator: who produced it and collected the reward
Transaction count and block size
Gas used vs. gas limit (Ethereum-specific)
Timestamp (creation time) and difficulty
Every transaction you’ve ever sent lives inside one of these blocks, and every block links backward to the genesis block through an unbroken chain of hashes. That backward link is the entire security model in one sentence change anything in an old block and every hash after it breaks.

Status: Shows whether the block has been finalized. In this example, the block is Unfinalized, meaning it has been added but has not yet reached final confirmation.
Transactions: This block contains 698 transactions along with 1,074 internal smart contract transactions.
Fee Recipient: Shows which validator or builder received the transaction fees. Here, the recipient is BuilderNet.
Block Reward: Displays the total reward earned from transaction fees included in the block.
Gas Usage: Indicates how much of the available gas limit was consumed. In this example, about 82% of the block’s gas limit has been used.
Transaction Actions: The colored grid provides a quick visual summary of the different types of transactions in the block, such as ETH transfers, token swaps, NFT transfers, approvals, and failed transactions.
Note: A single Ethereum block can contain hundreds of transactions. Rather than opening each one individually, the block page gives you a high-level view of network activity, validator rewards, gas usage, and the mix of transaction types included in that block.
How the Explorer Actually Works, Behind the Search Bar
Knowing what you can search for is one thing. Knowing how the explorer gets that data ready for you to search is the part that actually matters if you’re technical.
Data retrieval: the explorer runs (or connects to) full nodes on the target chain and continuously pulls new blocks and transactions as they land.
Parsing: raw block data isn’t human-readable. The explorer decodes it into transaction details, block headers, and address activity.
Indexing and storage: this is the part most people skip. The explorer doesn’t re-scan the entire chain every time you search. It maintains its own relational database (often SQL-based) with normalized tables (one for blocks, one for transactions, one for addresses) each row keyed so lookups are fast instead of requiring a fresh chain scan. A block table entry can point to a header table entry instead of duplicating that data everywhere it’s referenced.
API layer: most explorers expose a REST API on top of that database, which is how you’d pull this data programmatically instead of clicking through a UI. If you’ve ever pulled wallet balances or transaction history into a script, you were talking to this layer.
Real-time sync: the indexer keeps polling for new blocks, so the explorer never falls behind the actual chain state.
This is also why explorers can offer instant search across millions of transactions: you’re not querying the blockchain live; you’re querying a well-indexed database that mirrors it.
What is Mempool?
Most explorers also show you the mempool, the holding area for transactions that have been broadcast but not yet packed into a block. Your transaction lives here in the gap between “I hit send” and “it’s confirmed.”
The mempool is not first-in-first-out. During busy periods, a hyped NFT mint, a sharp market move, a large airdrop claim, thousands of transactions compete for the same limited block space at once. Higher fees get priority; lower fees wait, sometimes for hours. Checking the current mempool state before you send anything time-sensitive tells you exactly what fee you need to attach to get into the next block, instead of guessing. Mempool.space built its entire reputation around visualizing this for Bitcoin, and it’s worth spending ten minutes on it just to see fee competition happen live.

1. Pending Blocks (Left — Green): The green blocks represent virtual future blocks. These are not mined yet, they’re estimates based on the transactions currently waiting in Bitcoin’s mempool.
For each block, you can see:
~0 sat/vB: The approximate transaction fee rate needed to get into that block.
sat/vB means satoshis per virtual byte, which is how Bitcoin transaction fees are measured.
0.003 BTC: Total transaction fees miners would earn from that block.
3,482 transactions: Number of transactions expected in that block.
In ~59 minutes: Estimated time until this block is mined (assuming ~10 minutes per block).
What this tells you: If your transaction pays around the displayed fee rate, it will likely be included around that estimated time.
2. Recently Mined Blocks (Right — Purple): These are the latest blocks already added to the Bitcoin blockchain.
For each block, you can see:
Block Height (e.g., 961278): The block’s position in the blockchain.
Fee rate range: Lowest and highest transaction fees included.
Total fees earned (e.g., 0.011 BTC).
Number of transactions inside the block.
Time mined (“Just now”, “3 minutes ago”).
Mining Pool (e.g., MARA Pool, Foundry USA, AntPool).
It shows which miners found recent blocks and what fee levels were actually accepted.
3. Recommended Transaction Fees: This panel suggests how much fee to pay depending on how quickly you want confirmation. The dollar amount below each fee is simply an estimate of the transaction cost.
4. Difficulty Adjustment: Bitcoin automatically adjusts its mining difficulty approximately every 2,016 blocks (about every two weeks).
This panel shows:
Average block time: ~9.9 minutes
Current adjustment: +1.10%
Time remaining: ~2 days until the next adjustment
Since blocks are being mined slightly faster than the target 10 minutes, the difficulty is expected to increase by about 1.10%.
5. Mempool Statistics: This section summarizes the current state of the network.
Minimum fee: Lowest fee currently accepted into the mempool.
Memory Usage: Amount of memory the mempool is using (256 MB out of 300 MB here).
Unconfirmed Transactions: Around 90,709 transactions are waiting to be confirmed.
A high number of unconfirmed transactions usually means the network is busier, leading to higher transaction fees.
6. Mempool Goggles: This visualization represents every unconfirmed transaction currently waiting in the mempool.
Each rectangle is a transaction:
Larger rectangles = Larger transaction size.
Different colors = Different fee rates.
Transactions paying higher fees are generally more attractive to miners and are likely to be confirmed sooner.
It provides a visual overview of how crowded the mempool is.
7. Incoming Transactions Graph
The graph tracks how many new transactions are entering the mempool over time.
Spikes indicate periods of heavy Bitcoin activity.
More incoming transactions usually mean greater competition for block space, which can increase transaction fees.
Why This Matters Beyond “Did My Transaction Go Through”
Checking whether a transfer confirmed is the obvious use case. The less obvious ones are where explorers actually earn their place in a security or research workflow.
Verifying claims, not trusting them. Any protocol claiming to hold reserves in a smart contract, any exchange claiming proof of reserves, any token claiming a fixed supply, all of it is checkable against the actual chain data. “Don’t trust, always verify” only works if you have a way to verify, and this is that way.
Reading market signals early. Large wallet movements, exchange inflows and outflows, and unusual contract activity are visible on-chain before they show up in price charts. On-chain analysts build entire workflows around watching this data first.
Due diligence before you touch a new contract. Before interacting with an unfamiliar DeFi protocol or token, checking the contract on an explorer tells you whether the code is verified, how long it’s been live, how many wallets have interacted with it, and whether the deployer address has a history worth worrying about. Not bulletproof, but a real first filter.
Debugging stuck transactions. When a transaction is sitting there doing nothing, the explorer tells you why, still waiting in the mempool behind higher-fee transactions, failed from running out of gas, or replaced by a later transaction with a higher fee attached (Replace-By-Fee, on Bitcoin).
DeFi (decentralized finance) protocols are self-executing software programs built on public blockchains that automate financial services like lending, borrowing, and trading. They eliminate traditional middlemen like banks, allowing peer-to-peer transactions globally via crypto wallets.
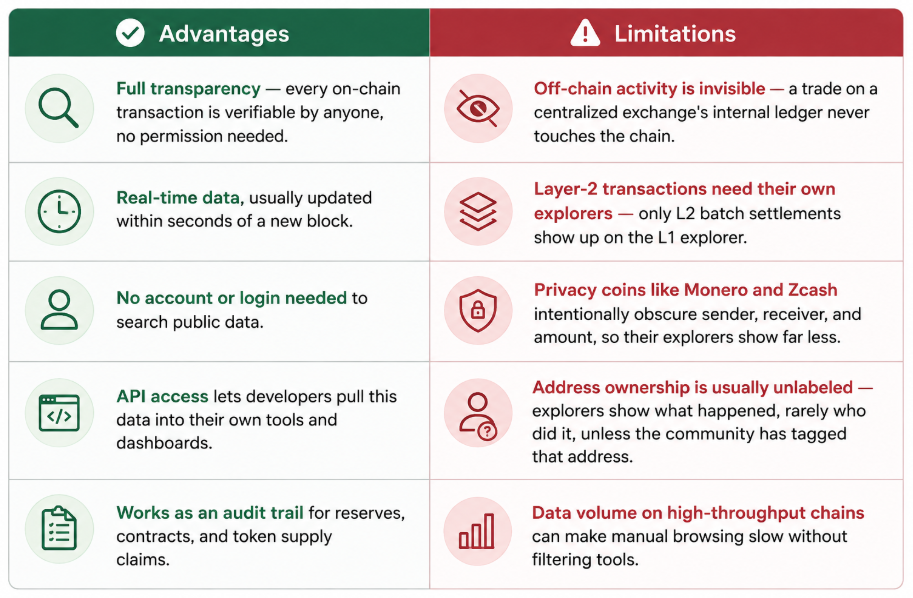
Advantages and Limitations
How to Pick the Right Blockchain Explorer
If you only need to look up a transaction occasionally, almost any explorer will do. But if you’ll use one regularly for development, research, or investigations, consider these factors:
1. Chain Coverage: Not every explorer supports every blockchain. Some are dedicated to a single network (like Ethereum), while others let you explore multiple blockchains from one place. Before choosing an explorer, make sure it supports the network you’re working with and keeps up with major protocol upgrades. An outdated explorer may miss newer transaction types or features introduced by the blockchain. Like if you are working on Polygon, using an explorer built specifically for Polygon will generally provide more complete and accurate information than one focused only on Ethereum.
2. API Access: If you’re building applications or automating blockchain queries, choose an explorer with a well-documented API. It lets you retrieve data like transactions, wallet balances, and token transfers programmatically instead of manually searching the website. Instead of copying transaction details manually, a wallet application can use an explorer’s API to fetch a user’s latest transactions automatically.
3. Address Labeling: Many explorers identify well-known wallet addresses, such as exchanges, protocol treasuries, bridge contracts, or known scam wallets. These labels save a significant amount of time, especially when investigating suspicious transactions or tracing the movement of funds. Seeing that a transaction was sent to “Binance Hot Wallet” is better informative than seeing only a 42-character wallet address.
4. Speed and Uptime: A reliable explorer should display new blocks and transactions quickly while remaining available during periods of high network activity. Faster updates are especially important when monitoring blockchain activity in real time.
So, in short choose an explorer that supports your blockchain, offers a good API, provides helpful address labels, and delivers fast, reliable access to blockchain data.
Try It Yourself
Open Etherscan or Mempool.space or blockchain explorer right now and search any recent transaction hash from your own wallet, or just click into the latest block on the homepage feed. Walk through the fields, status, fee, from/to, block height — and match them against what’s in this post. That five-minute exercise will do more for your understanding of “how blockchain works” than another five explainer articles will.
FAQs
What type of blockchain does an explorer show?
Only public blockchains, the ones anyone can read without permission. Private or permissioned blockchains (the kind used inside enterprises for internal record-keeping) aren’t publicly indexed, so there’s no public explorer for them, you’d need access to that organization’s own node to query anything.
Can I mine directly through a blockchain explorer? No. An explorer is a read-only window into the chain, it shows you who mined or validated a block, but it doesn’t give you any mining or validating capability yourself. To actually mine or validate, you’d need dedicated mining hardware and pool software (for proof-of-work chains like Bitcoin) or a staking setup with the minimum required stake (for proof-of-stake chains like Ethereum post-Merge).
What can I actually check or explore if I want to learn from this? A good starting list: pull up any verified smart contract on Etherscan and read its source code, trace a large wallet’s full transaction history to see how funds moved, check the mempool during a high-traffic period to watch fee competition in real time, or search the genesis block of a chain to see where it all started. Each of these builds a different piece of intuition, reading contracts teaches you Solidity patterns, tracing wallets teaches you how funds actually flow, and watching the mempool teaches you fee mechanics better than any article can.
What consensus mechanism does the explorer use?
The explorer itself doesn’t use a consensus mechanism; it is simply read-only window. Bitcoin’s explorer will show proof-of-work details (difficulty, hashrate, miner). Ethereum’s explorer shows proof-of-stake details (validator address, attestations) since the Merge. If you check the block summary page, the consensus-related fields tell you which type you’re looking at, even without reading the whitepaper.
Can I verify a smart contract’s code myself using an explorer?
Yes, and this is one of the more useful skills to build early. On Etherscan, if a contract’s source code has been verified and published, you can read the exact Solidity behind it under the “Contract” tab, check whether it matches what the project claims, and see if it’s been audited. Unverified contracts show only bytecode, which is a red flag worth noticing before you interact with one.


Comments