Setting Up Burp Suite with Android & Analyzing the Traffic - Part 1
- Aastha Thakker
- Mar 26
- 6 min read

Updated: Mar 27

The moment you open a mobile app, it starts communicating quietly, continuously, and often invisibly. Login credentials, session tokens, API calls, device identifiers: everything flows back and forth between your phone and remote servers. What you see on screen is just the surface. The real behavior lives in the network traffic.
If you work in cybersecurity, you have likely used Burp Suite to intercept browser traffic. But mobile applications are a different beast. They use certificate pinning, custom TLS stacks, and non-browser HTTP clients that bypass standard proxy settings. You cannot just point an Android app at Burp and expect it to work.
This blog is about setting up a fully operational Burp Suite interception environment for Android using Genymotion so you can see, modify, replay, and analyze real mobile traffic.
How Interception Actually Works?
Before touching any tool, it is worth understanding the mechanism.
Normal Traffic Flow (No Proxy): In a standard HTTPS connection, the Android app communicates directly with the remote server. All traffic is encrypted end-to-end using TLS. No third party can read the contents.
Proxied Traffic Flow (With Burp): When Burp Suite is configured as a proxy, it performs a man-in-the-middle (MITM) operation. The Android device believes it is talking to the real server, while Burp decrypts the traffic, lets you inspect and modify it, then re-encrypts it and forwards it upstream.
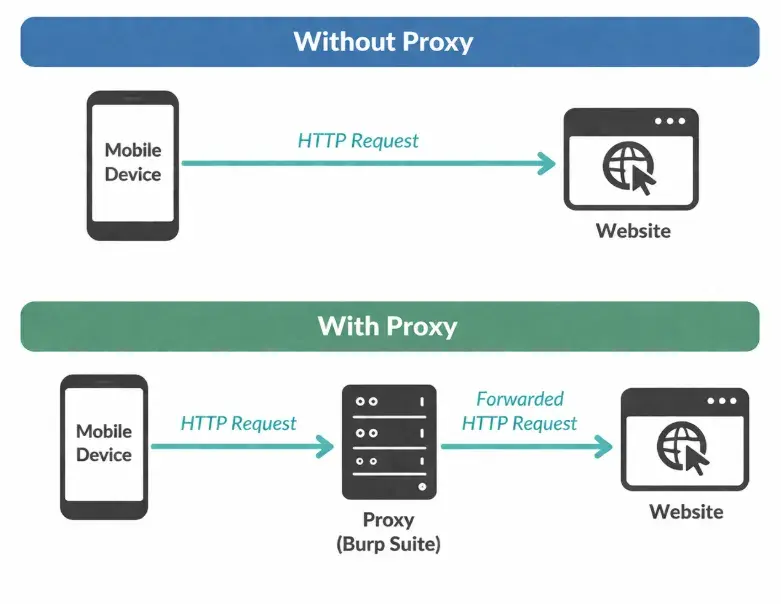
For this to work, two conditions must both be true:
• Network routing: The Android device must send its traffic to Burp’s listening port, not directly to the internet.
• Certificate trust: The Android device must trust Burp’s CA certificate, otherwise TLS handshakes will fail, and the app will show a connection error.
Environmental Setup:
Android virtual machine: Using Genymotion + VirtualBox. Easier to control and test. Use Android version 11 which has x86_64 architecture, so this won't hamper at the time of SSL pinning.
Prerequisites (Don’t Skip This)

Step 1: Setting up Burp Suite & Exporting Certificate
By default, Burp Suite only listens on localhost (127.0.0.1:8080). This means traffic from external devices, including your Android emulator running in a separate VM, cannot reach it. You need to add a listener that binds to all network interfaces.
You need to set up the proxy which will be the middleman between your web browser and website. For that go in the mentioned location and make the following changes.
Location: Proxy -> Options -> Proxy Listener -> Add 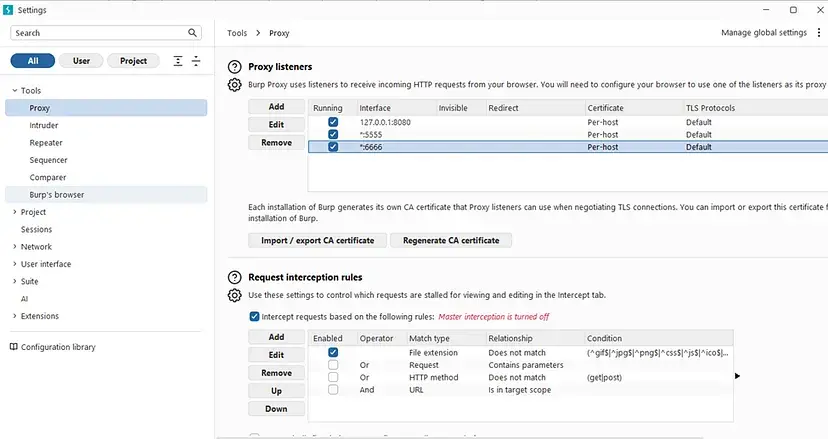
In the listener dialog:
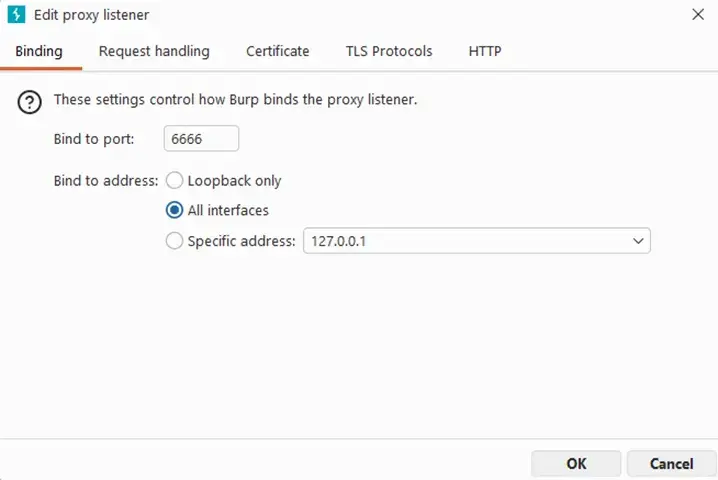
Bind to port: Choose any unused port. Default is 8080; I used 6666 to avoid conflicts.
Bind to address: Set to All interfaces. This makes Burp listen on your host machine’s LAN IP, which is what the Android VM will connect to.
2. Export the Burp CA Certificate. Click Import / Export CA Certificate, select Certificate in DER format, click Next, and save the file as cacert.der.

3. Rename the Certificate. Go to that file location and change the extension from .der to ‘.crt’. Android’s certificate installer expects a .crt extension, not .der.

The file contents do not change, only the extension. Android uses the extension to identify certificate files during installation. Android apps use HTTPS which has encrypted traffic. Burp must act as a trusted middleman therefore it needs certificate for the same. This certificate will later be installed on Android to trust Burp.
Step 2: Configure the Android to use Burp Proxy
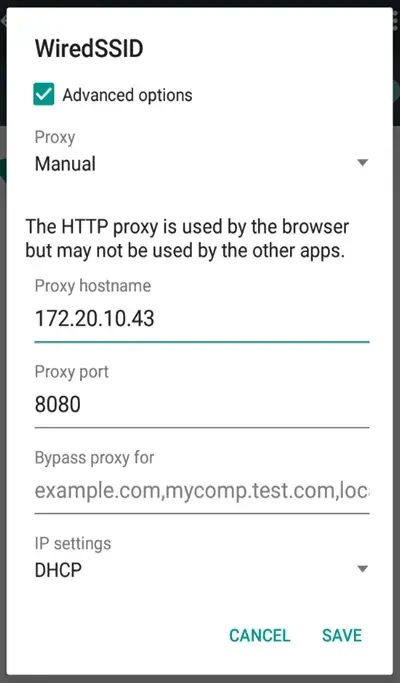
The Android emulator needs to know where to send its network traffic. You configure this through the Wi-Fi settings, the same way you would on a real device.
On Windows, open Command Prompt and run ipconfig. Look for the IPv4 Address under your active network adapter (usually Ethernet or Wi-Fi). This is the IP you’ll use as the proxy hostname.
Set Proxy in Android Wi-Fi Settings. Inside Genymotion, open the Android emulator and:
Go to Settings → Wi-Fi
Long-press the connected network and tap Modify network
Set Proxy to Manual
Enter Proxy hostname: your host machine’s LAN IP (e.g., 192.168.1.x)
Enter Proxy port: 6666 (or whichever port you configured in Step 1)

Step 3: Install the Burp Certificate on Android
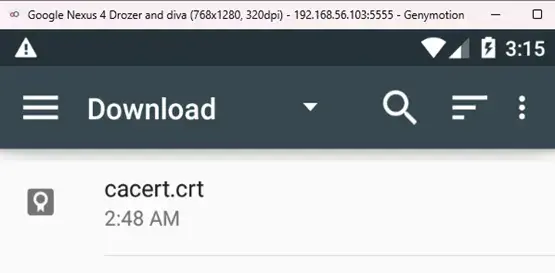
Without this, HTTPS traffic won’t decrypt. Drag and drop the cacert.crt file from your host machine directly onto the Genymotion window. Genymotion maps drag-and-drop to the emulated SD card. Inside android go to:
Settings -> Install from SD card -> Click on the certificate -> Add Certificate Name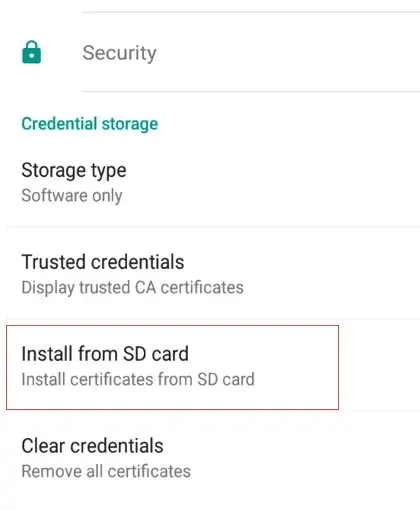
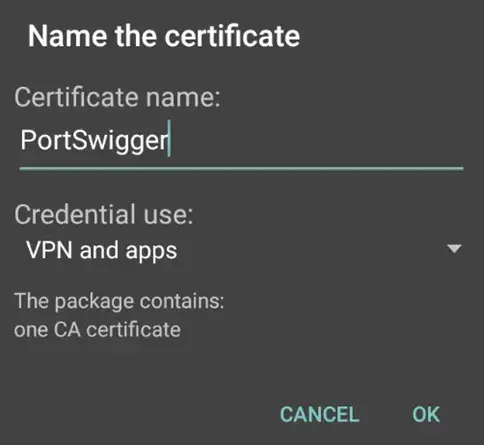
Once you have added certificate name you will see the small notification of installation confirmation.
2. After doing this, click back and go to ‘Trusted Credentials’ and click ‘User’. You will see your certificate CA, which means your configuration is properly done.
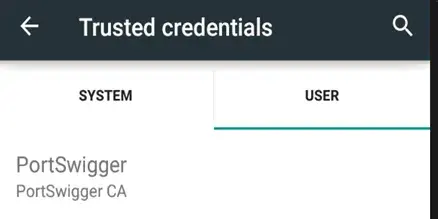
If the certificate does not appear under “User” in Trusted Credentials, the installation failed. Repeat Step 3.2 and ensure you selected the correct .crt file.
Step 4: Set Global Android Proxy via ADB
Wi-Fi proxy settings only affect traffic from apps that respect the system proxy. Many Android apps and all background processes bypass it. Setting a global proxy via ADB forces all traffic through Burp, regardless of the app. I have referred this step from (LINK) here.
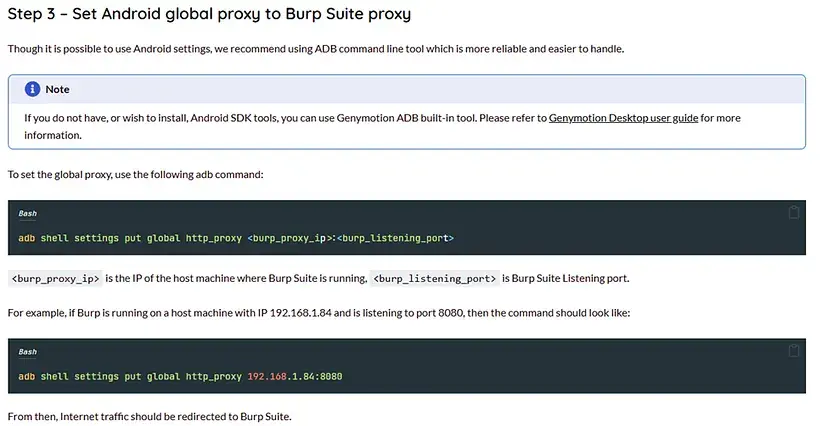
Use these commands to set your global proxy.

2. If you have not installed adb in your VM then type:
wget https://dl.google.com/android/repository/platform-tools-latest-linux.zip
unzip platform-tools-latest-linux.zip
cd platform-tools
In this we will download frida and objection also.

3. Clear the Proxy (When done). Always remove the proxy setting when you finish testing. Leaving it active can break normal connectivity in the emulator.
# Remove the global proxy
adb shell settings put global http_proxy :0
Step 5: Frida & objection installation
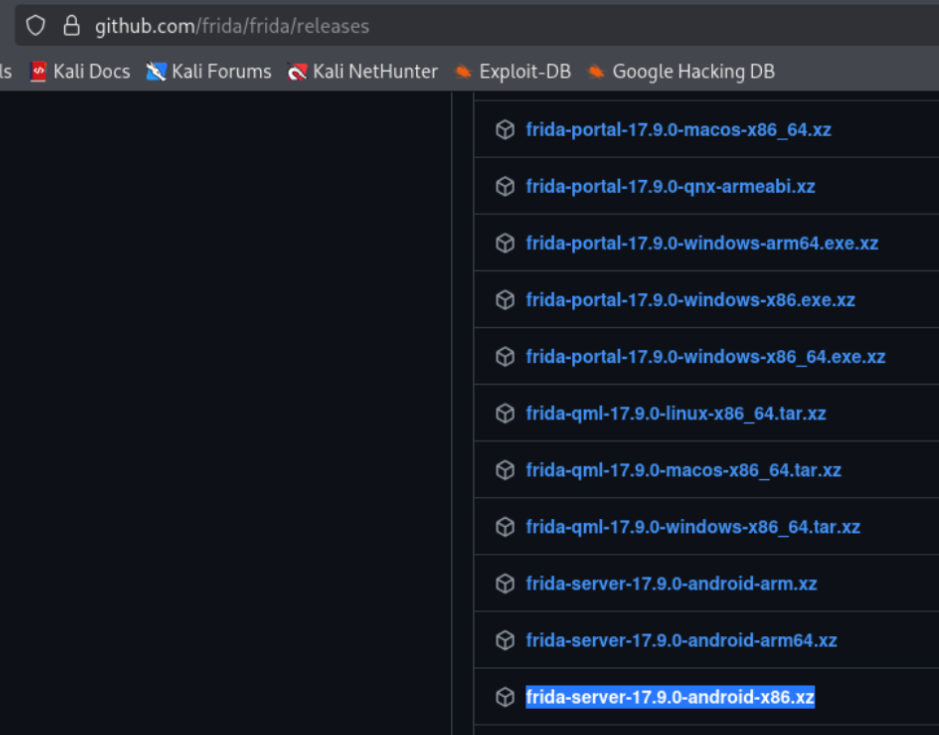
For downloading frida server, go to this link. Download 'Android server's latest version', current version is shown in the image.
Download the frida to host machine. Extract xz file and rename it to frida-server for ease. Then connect adb, check the devices and push frida server to location '/data/local/tmp'. Change the permissions and run the server.
adb connect <ip>:<port>
adb devices
adb push frida-server-location /data/local/tmp

# Check the installation and run
adb shell
cd /data/local/tmp
ls
chmod 755 frida-server
./frida-server

## frida client version and frida server version should be same. Check using '--version'.

Now in your machine (Santoku/linux), install frida tools & objection. (Use --break-system-packages where pip doesn't work or any unexpected error comes up.)
# Install pip if you already haven't
sudo apt install python3-pip

# Install Frida and Objection via pip
pip3 install frida-tools objection

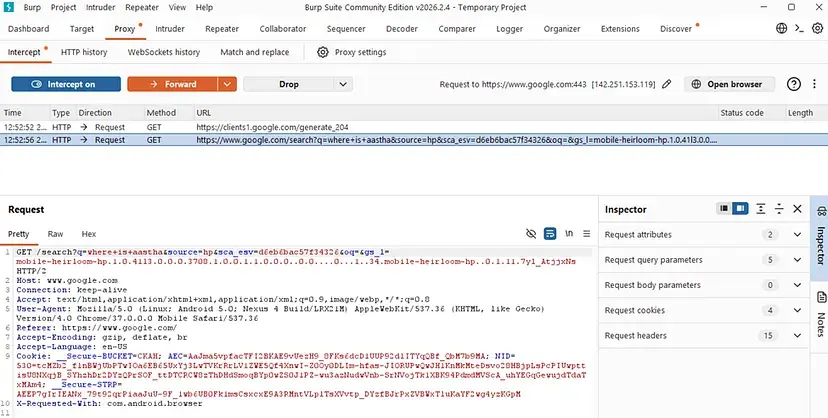
Step 6: Verify Interception is Working
Very near to our goal of setting up this environment. Now confirm that Burp is actually intercepting traffic before you start testing real applications.
In Burp Suite, go to Proxy → Intercept and ensure Intercept is on is active (the button should say that, not “Intercept is off”).
Open the browser inside the Android emulator and search anything. Try www.aasthathakker.com first (HTTP, no TLS) to confirm basic routing.
Switch back to Burp Suite. You should see the intercepted request in the Proxy → Intercept panel. Click Forward to pass it through. The request will include the URL, HTTP method, request headers etc.
You’re no longer just using the app; you’re observing it and questioning it.
Troubleshooting
If something is not working, go through this checklist before re-doing any steps.
Problem: Unable to browse properly; redirections are failing.
If you try searching for something on Android and encounter repeated redirections but the search still fails, it may be a browser-related issue.
In such cases, install Firefox instead of using the default browser and try searching again. If it shows a security warning, go to Advanced Settings and proceed anyway.
Problem: Browser shows “Connection refused” or page does not load
Verify Burp’s proxy listener is active (green dot next to it in the Listeners list)
Verify the listener is bound to All interfaces, not just localhost
Check that the Wi-Fi proxy hostname in Android matches your host machine’s actual LAN IP
Ensure Windows Firewall is not blocking the Burp port (add an inbound rule if needed)
Problem: HTTPS sites show a certificate error in the browser
The Burp CA is not trusted. Repeat Step 3 and verify the cert appears under Trusted Credentials → User
Ensure you renamed the file to .crt before dragging it into Genymotion
Some Android versions require you to set a screen lock before installing user certificates
Problem: App-specific traffic not appearing (browser works, app does not)
The app likely implements SSL certificate pinning. This is expected behavior
This requires Frida + Objection to bypass, will be covered in another part.
What’s Next? Bypassing SSL Pinning
You now have a fully operational mobile traffic interception environment. Basic apps without certificate pinning are fully transparent to you.
However, many production apps, especially banking, fintech, and social media, implement SSL certificate pinning. This means the app hardcodes the expected server certificate and rejects Burp’s CA even when it is installed as trusted.
In the next part we will see:
Frida: Dynamic instrumentation to hook into the app’s TLS verification at runtime
Objection: Frida-based toolkit with a one-command SSL pinning bypass


Comments